
The leading trio of video editing software—Final Cut Pro, Premiere, and Resolve—often adopts features from each other over time. Some features transition quickly, like FCP’s Voice Isolation being mirrored by Resolve, or Resolve’s curves appearing in both FCP and Premiere. Others, such as Premiere’s timeline adopting a ripple operation akin to FCP’s, may take over a decade to integrate.
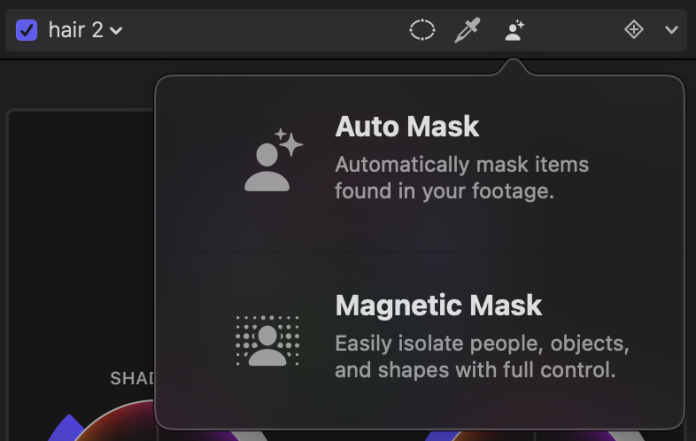
Resolve’s Magic Mask served as inspiration for FCP’s speedier Magnetic Mask and eventually Premiere’s Object Mask. These analogous features are invaluable across these platforms. Currently exclusive to FCP, Auto Mask is a remarkable addition that excels in areas where traditional tracking might fall short.
Unlike conventional tracking methods, Auto Mask identifies elements like people, parts of a scene, or even pets, frame by frame. This method is highly resistant to occlusions, making it a potent tool for selective color corrections and more.
Previously, I shared initial insights on FCP 12.3, but a deeper dive is warranted. Let’s explore Auto Mask from the ground up before delving into advanced workflows.
Understanding Auto Mask
Starting with Auto Mask is straightforward:
- To manage a clip’s visibility, apply the Auto Mask effect found under the Masks and Keying category directly to the clip.
- To limit an effect or color correction, click the new Auto Mask button located in every effect’s header (Shape and Color Masks are accessible here too).

The Auto Mask menu allows for various selections. Choose from 17 potential masks:
For People
- People
- Skin
- Skin and Face
- Hair
- Facial Hair
- Mouth
- Lips
- Teeth
- Eye
- Eyebrow
- Clothing
For Scenes
- Sky
- Foliage
- Foreground
- Background
For Animals
- Dog
- Cat

Combine different Auto Masks by adding, subtracting, or intersecting them. For instance, select animals in the foreground that aren’t cats. Fine-tune using Shrink/Expand, Erode, and Blur options.
When applying color corrections, use the Inside/Outside switch to access both sides of the mask efficiently. Invert a mask if needed from the menu next to an effect header.

While Magnetic Mask, Color Mask, and Shape Mask remain available for additional adjustments, they might not be necessary. However, sometimes a shape might not be accurately detected in every frame, causing parts of an object to flicker within the mask. For example, lips viewed from the side may not always be detected, and over-ear headphones may cause inconsistencies.
Overall, Auto Mask is efficient, practical, and quick for most scenarios.
With the basics covered, let’s explore some practical Auto Mask workflows.
Enhancing Color in People
Adjusting color tones in videos is both practical and common. While not all subjects are concerned about their appearance in professional videos, some are quite conscious, and Auto Mask unlocks new possibilities for adjustments.
For instance, if a subject is dissatisfied with how their lipstick appears, altering it is straightforward. Apply Color Wheels, then use an Auto Mask on Lips. Ensure the mask is accurately identified in every frame.

To whiten teeth, reduce saturation and adjust exposure using an Auto Mask set to Teeth. Eyebrows can be modified in terms of color, and skin tones can be balanced for subjects regularly recorded under varying conditions. Selecting clothing is straightforward, but all garments will be selected, requiring additional color, shape, or magnetic masks for specificity.
Before making drastic hair color changes, remember my go-to rule from retouching:
- Subtle adjustments tend to look more natural than drastic changes.
Hair color alterations involve more than just hue or brightness adjustments. Begin with Color Wheels to fine-tune shadows, midtones, and highlights in terms of saturation and hue. If needed, refine using Curves.
For a demonstration of what’s possible, Jenn Jager’s video is worth watching:
Masking Profanity
If you need to censor a mouth during profanity, it’s simple. Use the blade tool to isolate the section needing coverage. Navigate to the Stylize category and apply the Pixellate effect to that section, using an Auto Mask set to Mouth. Adjust block size, expand, and blur the mask as necessary. For audio, add the Test Oscillator effect to replace the sound with a beep.
Refer to Brad West’s video for more ideas:
Bringing Color to Black and White Videos
Restoring color to black and white footage is possible by applying distinct color corrections to different parts of a person, step by step. A similar effect can be achieved using a color image as a base, although using the Tint effect may be preferable for a flat color look.
Robin Kurz’s video offers a plethora of tips, including this one:
Sky Replacement Techniques
A simple method involves color correction. Use Color Wheels and set an Auto Mask to Sky for a deeper or more vibrant effect. However, entirely replacing the sky means importing your new sky image.
Although Robin Kurz’s video covers this process, if the shot involves movement, you’d need to track the new sky and potentially feather the edges. Dylan Bates, known as The Final Cut Bro, covers these steps in detail:
Seamlessly Integrating Titles
Integrating titles creatively within a scene is easier with Auto Mask. For best results, use a tripod shot featuring foreground and background elements, like people.
- Duplicate the clip by option-dragging it above itself, ensuring no shift in timing.
- Select and hide the original background clip using the V key.
- Apply Auto Mask to the top layer, choosing Foreground or another option that retains your subjects. Sky (inverted) works for adding text over sky in drone shots. Ensure the selection maintains clean edges throughout, making tweaks with additional masks as needed.
- Insert a title (animated or static) between clips and position it accordingly.
- Unhide the original background clip using the V key.
This method is demonstrated in videos by both Brad West and Dylan Bates.
Lighting Adjustments: Foreground or Background
While traditional shape masks are ideal for simulating a light following a subject, Auto Mask simplifies tasks like darkening a background or lightening a foreground, creating subtle yet effective changes.
Achieve this by applying a Color Board, Color Wheels, or Color Adjustments, masking to Foreground or Background. Adjust exposure selectively, so if a subject’s attire or skin appears darker than anticipated, it’s easily fixable.
Creative Visual Effects
If your project embraces a lo-fi aesthetic, Auto Mask offers creative freedom to alter a person or their surroundings. Consider these options:
- Stylize > Halftone with Auto Mask set to Person for a newsprint-style transformation.

- Comic Looks > Comic Ink with Auto Mask on Hair for a comic book effect.

- Tiling > Visual Echo with an Auto Mask set to Person, then inverted, to layer the original over clones.

- Tiling > Kaleidoscope (or similar transformative filters) with Auto Mask set to Person or Foreground for silhouette effects.

- For those with third-party effects like FxFactory Pro, try applying effects such as God Rays solely to backgrounds for striking results.

Note that effects involving image movement remain tied to the original mask position, but experimenting with effects like Handheld might yield creative results.
Limitations and Challenges
While skin color adjustments are straightforward, achieving a smooth skin appearance is challenging. Gaussian Blur, even at reduced settings, often results in an unnatural look. Currently, no built-in FCP blurs effectively address this.
I’m developing a skin smoothing plugin—contact me if interested in testing it. Meanwhile, Pixelmator Pro’s Selective Clarity adjustment is a viable option, though it’s not an FCP effect. It requires exporting and re-importing clips processed in Pixelmator Pro, then applying an Auto Mask set to Skin.
The same caution applies to background blurring—it often appears artificial. An effective approach would involve a depth mask for selective blurring, a technique rarely executed well. Wide aperture lenses on large sensors are still essential.

While Auto Mask can substitute for a green screen, flickering can occur with smaller masks or along larger mask edges. More control over temporal stability would enhance handling challenging masks.
Another consideration is playback—though generally smooth, Auto Mask can increase rendering times. Use ⌃R to render specific clips for optimal playback speed.
Conclusion
Auto Mask significantly simplifies isolating various parts of a shot without pre-tracking, expediting experimentation with different shot styles. It facilitates changes that previously seemed too tedious or complex to track. While not a universal solution, its versatility suggests it will likely appear in Resolve and Premiere soon. Update to FCP 12.3 and explore its potential.