
The leading video editing applications—Final Cut Pro, Premiere, and Resolve—often draw inspiration from one another. Some features, like FCP’s Voice Isolation copied by Resolve or Resolve’s curves mimicked by FCP and Premiere, are adopted swiftly, while others take years, such as Premiere’s updated timeline resembling the new FCP’s ripple operation.
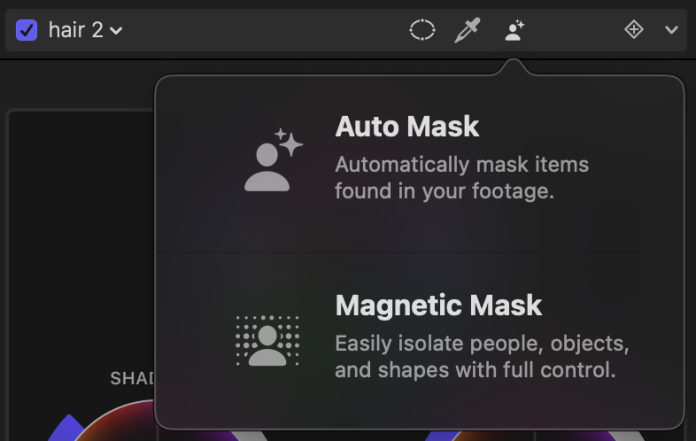
FCP’s Magnetic Mask, inspired by Resolve’s Magic Mask, and Premiere’s Object Mask all stem from similar ideas, making these features valuable across platforms. Currently exclusive to FCP, Auto Mask is a remarkably effective tool. Unlike traditional tracking, Auto Mask offers a more efficient solution in many scenarios.
Rather than tracking objects or people through a scene, Auto Mask identifies elements such as people, parts of a scene, or even pets on a frame-by-frame basis. It excels in handling occlusions, making it ideal for tasks like selective color correction.
Building on my previous article about FCP 12.3, let’s revisit the basics and delve deeper into practical applications.
Understanding Auto Mask
There are straightforward ways to start with Auto Mask:
- Add the Auto Mask effect directly to a clip to control clip visibility. Find it under the Masks and Keying category.
- Apply Auto Mask to an effect or color correction by clicking the Auto Mask button in the effect header. Shape and Color Masks are also available here.

The Auto Mask menu offers 17 mask options for selection:
Person
- People
- Skin
- Skin and Face
- Hair
- Facial Hair
- Mouth
- Lips
- Teeth
- Eye
- Eyebrow
- Clothing
Scene
- Sky
- Foliage
- Foreground
- Background
Animals
- Dog
- Cat

Masks can be combined or tweaked using Shrink/Expand, Erode, and Blur settings for precision. You can switch between Inside/Outside when applying color corrections, allowing changes on either side of the mask. To invert a mask, use the menu next to the effect header.

The Magnetic Mask, Color Mask, and Shape Mask remain available to refine Auto Masks when needed. While generally reliable, certain frames may require manual adjustments, such as when a subject is viewed partially or wearing over-ear headphones.
Auto Mask offers a reliable, quick, and efficient editing solution for most shots. Now, let’s explore practical uses of Auto Mask.
Enhancing Color in People
One of the primary uses of Auto Mask is adjusting colors in subjects, a valuable tool for ensuring participants are happy with their appearance in videos. For instance, if a subject dislikes how their lipstick looks, you can easily adjust it using Color Wheels and an Auto Mask for Lips, ensuring the mask aligns properly across frames.

Teeth whitening is easily achieved by reducing saturation and adjusting exposure with an Auto Mask. Skin tone adjustments are straightforward, allowing for consistency over multiple videos. Clothing selections are simple, though additional masks may be needed for precision.
Remember, small adjustments often yield the most natural results. Transforming hair color, for example, involves careful consideration of shadows, midtones, and highlights. For intricate control, Curves is recommended.
Watch Jenn Jager’s video for a comprehensive demonstration of these techniques:
Concealing Mouths
To censor mouth movements during profanity, blade the section requiring coverage, apply the Pixellate effect from the Stylize category, and select an Auto Mask for the Mouth. Adjust the pixel size and mask properties for a seamless effect. Add the Test Oscillator audio effect for appropriate audio replacement.
Brad West’s video offers additional insights on this technique:
Colorizing Black and White Footage
Restoring color to black and white footage is possible by applying distinct color corrections to various elements of the frame. Alternatively, for a flat-color look, use the Tint effect on colored footage. Robin Kurz’s video explores this and other tips:
Replacing Skies: Basic and Advanced Techniques
For a simple fix, use color correction to enhance sky vibrancy by setting an Auto Mask to Sky. For complete sky replacement, add a new sky layer. Robin covers these techniques, and for moving shots, Dylan Bates demonstrates tracking and blending in another tutorial:
Seamlessly Integrating Titles into Scenes
Previously achievable with Magnetic Mask, Auto Mask simplifies this effect. Begin with a tripod shot featuring distinct foreground and background elements.
- Duplicate the clip and position it above the original without altering the timing.
- Select and hide the original background clip by pressing V.
- Apply Auto Mask to the duplicate clip, choosing Foreground or other relevant options. Verify clean edges and make necessary tweaks with additional masks.
- Insert a title between the clips and adjust its position as needed.
- Reactivate the original background clip by pressing V.
This method is highlighted in both Brad West’s and Dylan Bates’s videos.
Lighting Adjustments for Foreground and Background
Auto Mask is ideal for subtle lighting adjustments, such as darkening a background or highlighting a foreground. Apply a Color Board, Color Wheels, or Color Adjustments, and select a Foreground or Background mask. This allows for selective exposure alterations to correct unexpected lighting discrepancies.
Applying Selective Visual Effects
For a creative touch on projects with a lo-fi aesthetic, use Auto Mask to focus effects on specific elements. Experiment with:
- Stylize > Halftone with a Person mask to create a newsprint effect.

- Comic Looks > Comic Ink with a Hair mask for a comic book appearance.

- Tiling> Visual Echo with an inverted Person mask to overlay the original on top of clones.

- Tiling > Kaleidoscope with a Person or Foreground mask for a silhouette effect.

- Third-party effects like FxFactory Pro’s God Rays can be applied selectively to backgrounds for stunning results.

Note that effects involving image movement will adhere to the original mask’s position. For an interesting effect, apply Handheld to a person, offsetting the shot within the original’s outline.
Limitations of Auto Mask
While color adjustments are straightforward, smoothing skin to reduce wrinkles is challenging. Gaussian Blur is ineffective, often yielding an unnatural appearance. Current built-in FCP blurs do not address this issue effectively.
I’m developing a skin smoothing plugin—feel free to reach out if interested in testing it. Meanwhile, Pixelmator Pro’s Selective Clarity adjustment can be used for video, although it requires exporting and re-importing the clip, as it doesn’t function as an FCP effect.
Similarly, blurring backgrounds often appears unrealistic. Achieving this effect requires a depth mask and selective blur, which remains a complex task. Traditional methods, like using wide apertures on large sensors, are often preferable.

Additionally, while Auto Mask can substitute for a green screen, flickering issues can arise with smaller masks or the edges of larger ones. Enhancing temporal stability could improve tricky mask performance.
Performance-wise, Auto Mask playback is generally smooth but can extend render times. Use ⌃R to render specific clips for full-speed playback.
Summary
Auto Mask simplifies isolating various elements within a shot, eliminating the need for traditional tracking. This facilitates experimentation with innovative shots and expedites changes that were previously tedious or time-consuming. While not universally applicable, it’s a powerful tool likely to inspire similar features in Resolve and Premiere. Update to FCP 12.3 and explore these possibilities.