
In the world of video editing, the major players—Final Cut Pro, Premiere, and Resolve—often borrow features from one another. Sometimes, this happens quickly, as seen with FCP’s Voice Isolation being mirrored in Resolve, or Resolve’s curves being adopted by both FCP and Premiere. At other times, it takes much longer, such as Premiere’s timeline now reflecting a ripple operation akin to the latest FCP version, a shift that took over a decade.
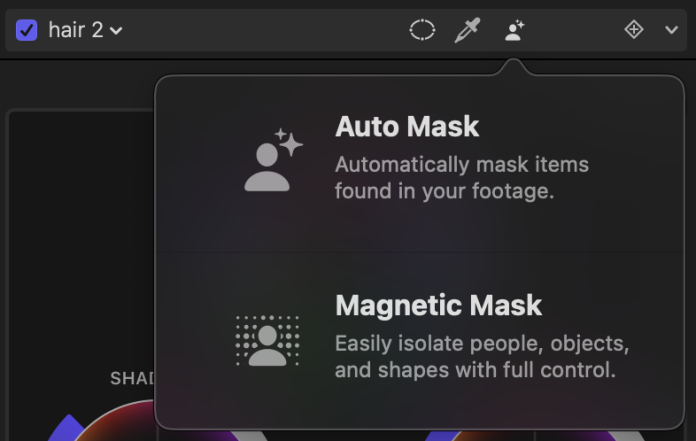
FCP’s (faster) Magnetic Mask, inspired by Resolve’s Magic Mask, eventually led to Premiere’s Object Mask. While these similar features are valuable across the board, Auto Mask is currently unique to FCP—and it’s exceptionally powerful. Unlike traditional tracking methods, Auto Mask offers a more efficient alternative.
Auto Mask automatically identifies elements like people, scene parts, or pets in each frame, making it resistant to occlusion and perfect for tasks like selective color correction and more.
Having touched upon some concepts in my initial FCP 12.3 article, it’s worth diving deeper into Auto Mask’s potential. Let’s begin with an overview before exploring its practical applications.
Understanding Auto Mask
There are two straightforward methods to start using Auto Mask:
- Apply the Auto Mask effect (found in the Masks and Keying category) directly to a clip to manage its visibility.
- To narrow down an effect or a color adjustment, click the new Auto Mask button in the effect’s header, where you’ll also find Shape Masks and Color Masks.

Within the Auto Mask menu, choose from 17 available masks to reveal desired elements:
Person
- People
- Skin
- Skin and Face
- Hair
- Facial Hair
- Mouth
- Lips
- Teeth
- Eye
- Eyebrow
- Clothing
Scene
- Sky
- Foliage
- Foreground
- Background
Animals
- Dog
- Cat

Masks can be combined, subtracted, or intersected for complex selections, like identifying animals in the foreground but excluding cats. Fine-tuning options like Shrink/Expand, Erode, and Blur are available.
For color corrections, you can toggle between Inside/Outside of masks easily, and inversion is possible using the menu next to an effect header.

While Magnetic, Color, and Shape Masks remain available for adjustments, they’re not always needed. Sometimes, however, shapes may not be recognized perfectly in every frame, causing parts of an object to flicker in and out of the mask—like lips in profile or gaps between over-ear headphones and heads.
Overall, Auto Mask is fast, reliable, and incredibly useful for most shots.
With the basics covered, let’s explore practical workflows for Auto Mask.
Enhancing Color in People
This common yet effective use of Auto Mask addresses appearance sensitivities in professional videos. For instance, if a subject dislikes how their lipstick appears on camera, Color Wheels and an Auto Mask set to Lips can easily adjust the color. Make sure the mask tracks accurately throughout each frame.

Teeth whitening is a breeze with a saturation reduction and exposure tweak, using a Teeth mask. Adjust Eyebrows, even out tanning differences, or change clothing color, though additional masks may be necessary for specific garments.
Before attempting drastic changes, consider the best practice from my retouching days:
- The closer a retouch is to reality, the more believable it is.
Simply put, subtle changes look more natural than extreme ones.
Hair color changes involve more than a simple hue shift; consider using Color Wheels to adjust shadows, midtones, and highlights carefully. For precision, Curves can offer finer control.
For a demonstration of the possibilities, check out Jenn Jager’s video:
Concealing Mouths
If you need to cover a mouth during a profanity-laden moment, this technique is simple. Use the Blade tool to isolate the section, then apply the Pixellate effect from the Stylize category to this segment, with an Auto Mask set to Mouth. Adjust block sizes, and expand or blur the mask as needed. For audio, add the Test Oscillator effect to replace sound with a beep.
Brad West’s video offers a visual guide to this and other creative solutions:
Restoring Color to Black and White Videos
By applying different color corrections to various parts of a person, you can bring color back to black and white footage, one section at a time. Starting with a color image, you might use the Tint effect for a flat-color look instead of color corrections.
Robin Kurz’s video provides additional insights on this and other techniques:
Sky Replacement Techniques
The simplest method is to use color correction with Color Wheels and an Auto Mask set to Sky for a more vibrant or deeper hue. For full sky replacement, add a new sky layer.
Robin’s video covers the fundamentals, but for moving shots, you’ll need to track the replacement sky and possibly feather the edges. Dylan Bates’s video delves into these advanced techniques:
Embedding Titles into Your Scene
A popular effect, made easier with Auto Mask, integrates titles seamlessly. For this effect, a tripod shot with clear foreground and background elements is ideal:
- Duplicate the clip above itself without altering the timeline position.
- Hide the original clip by pressing V.
- Apply Auto Mask to the top layer and choose Foreground or another option to preserve subject(s). In a drone shot, an inverted Sky mask works for text over the sky. Ensure clean edges throughout the clip, using magnetic, shape, or color masks if needed.
- Insert a title between the clips and place it accordingly.
- Reveal the original clip by pressing V.
Both Brad West’s and Dylan Bates’s videos illustrate this technique.
Adjusting Light in Foreground or Background
Our eyes are drawn to light, and while a tracked shape mask is ideal for simulating light following a subject, Auto Mask excels at subtly darkening backgrounds or illuminating foregrounds. This is simple: apply a Color Board, Color Wheels, or Color Adjustments to the clip, then mask to Foreground or Background. Selective exposure changes are also possible, easily correcting dark clothing or skin tones.
Applying Selective Visual Effects
For projects embracing a lo-fi vibe, Auto Mask allows for creative exploration with individual or surrounding elements, such as:
- Stylize > Halftone with a Person mask to transform people into newsprint-like images

- Comic Looks > Comic Ink with a Hair mask for comic book-style hair

- Tiling > Visual Echo with a Person mask, inverted, to superimpose the original person over their clones

- Tiling > Kaleidoscope (or other transformative filters) with a Person or Foreground mask for a silhouette effect

- For those with access to third-party effects like FxFactory Pro, try confining effects like God Rays to background elements — the results can be quite striking.

Bear in mind that effects causing image movement will adhere to the original mask position. However, experimenting with effects like Handheld applied to a person, offsetting within their outline, is encouraged.
Limitations to Consider
While changing skin color is straightforward, smoothing skin to reduce wrinkles is more complex. Gaussian Blur often results in an unnatural plastic look, and none of FCP’s built-in blurs adequately address this issue.
I’m currently developing a skin-smoothing plug-in—feel free to reach out if you’re interested in trying it. Meanwhile, Pixelmator Pro’s Selective Clarity adjustment, set to reduce midtones, offers a viable alternative. Although it works on video, it doesn’t function as an FCP effect. You’ll need to export your clip, process it, re-import it, and apply a Skin mask via Auto Mask.
Blurring the background of a clip often appears unrealistic. Proper execution requires a depth mask and selective blur application throughout the image, a feat rarely accomplished well. Large sensors with wide apertures still hold an advantage.

Though Auto Mask can substitute for a green screen, flickering may occur with smaller masks and at the edges of larger ones. More control over temporal stability would enhance complex mask handling.
Finally, while Auto Mask playback is generally smooth, it can slow down render times. Use ⌃R to render specific clips for full-speed playback when necessary.
Conclusion
Auto Mask revolutionizes the ability to swiftly isolate numerous shot elements without prior tracking. This encourages experimentation with shot types and simplifies changes that were once cumbersome or time-consuming. While not a universal solution, its effectiveness suggests it may soon appear in Resolve and Premiere. Download the latest FCP 12.3 update and explore its capabilities.