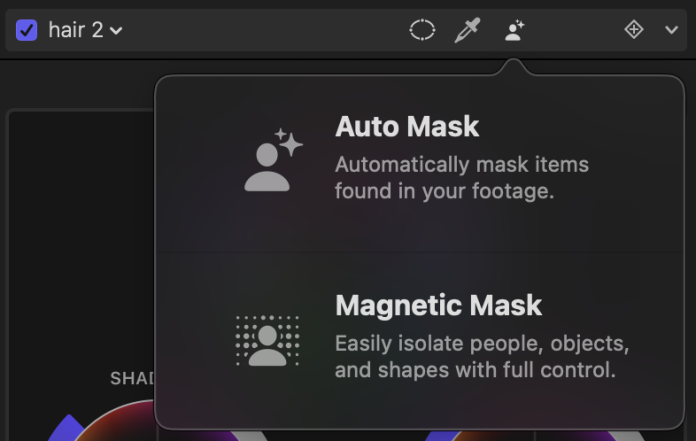

Major video editing software like Final Cut Pro, Premiere, and Resolve tend to incorporate each other’s features over time. Some features get shared quickly, such as FCP’s Voice Isolation adopted by Resolve, while others take years, such as Premiere’s timeline mimicking FCP’s ripple operation. Resolve’s Magic Mask led to the creation of FCP’s faster Magnetic Mask and Premiere’s Object Mask, both invaluable tools across these platforms. Currently, Auto Mask is exclusive to FCP and offers impressive functionality, often serving as a superior alternative to tracking.
Auto Mask in FCP automatically identifies people, scene elements, or even pets in each frame, offering a robust solution to issues like occlusion. It’s a game-changer for selective color correction and a multitude of other applications.
Having explored some features in my initial FCP 12.3 article, a deeper dive is warranted. Let’s begin with a quick overview before exploring its practical uses.
Understanding Auto Mask
There are two straightforward methods to utilize Auto Mask:
- Apply the Auto Mask effect from the Masks and Keying category directly to a clip to manage its visibility.
- Use the Auto Mask button in each effect header to confine an effect or color correction. Shape Masks and Color Masks are also accessible here.

The Auto Mask menu offers a selection of 17 potential masks:
Person
- People
- Skin
- Skin and Face
- Hair
- Facial Hair
- Mouth
- Lips
- Teeth
- Eye
- Eyebrow
- Clothing
Scene
- Sky
- Foliage
- Foreground
- Background
Animals
- Dog
- Cat

Auto Masks can be combined, subtracted, or intersected to refine selections, such as choosing animals in the foreground except cats. Settings like Shrink/Expand, Erode, and Blur allow for further adjustments.
When used for color corrections, the Inside/Outside switch provides easy access to alter both sides of the mask. The mask can be inverted via the menu next to an effect header if needed.

Alongside Auto Mask, the Magnetic Mask, Color Mask, and Shape Mask remain, offering various ways to modify an Auto Mask. Occasionally, a shape might not be accurately recognized in every frame, leading to flickering issues. For instance, lips from a side view or headphone gaps might be inconsistently detected.
Overall, Auto Mask is dependable, efficient, and effective in most scenarios.
Now that we’ve covered the basics, let’s explore some practical workflows using Auto Mask.
Enhancing Colors on People
Adjusting color on individuals is a common yet practical application. Many subjects in professional videos are concerned about their appearance, and Auto Mask facilitates new possibilities for adjustments.
For instance, if a subject dislikes their lipstick appearance, it can now be easily altered by applying Color Wheels with an Auto Mask set to Lips. Ensure the mask is accurately detected throughout the footage.

Teeth can be whitened by reducing saturation and adjusting exposure, while eyebrows can be darkened or lightened. Skin adjustments are effective for subjects with varying tans across videos. Although clothing selection is straightforward, additional masks might be needed for specific adjustments.
Remember, subtle changes often yield the best results:
- Retouching is more convincing when it remains close to reality.
Transforming hair color involves more than simple hue shifts. Start with Color Wheels to adjust shadows, midtones, and highlights in saturation and hue. For finer control, use Curves as needed.
For a demonstration of what’s achievable, watch Jenn Jager’s video:
Censoring Mouths
If you need to cover a mouth during a profanity, Auto Mask makes it simple. Split the section needing censorship, apply the Pixellate effect from the Stylize category, and set Auto Mask to Mouth. Adjust block sizes, then expand and blur the mask to fit. For audio, replace the section with a beep using the Test Oscillator audio effect.
For a video guide and more tips, check out Brad West’s video here:
Reviving Color in Black and White Videos
By applying distinct color corrections to different parts of a subject, you can restore color to black and white footage. You can achieve a similar effect starting with a color image, using the Tint effect for a flat-color appearance.
Robin Kurz’s video offers additional insights on this technique:
Replacing Skies, Simple and Advanced Techniques
The basic technique involves color correction using Auto Mask set to Sky to enhance the sky’s vibrancy. For a complete replacement, add a new sky, as detailed in Robin’s video above. For moving shots, track and blend the replacement clip, as demonstrated by Dylan Bates, the Final Cut Bro:
Seamlessly Integrating Titles
Creating integrated titles was already streamlined with Magnetic Mask, but Auto Mask simplifies it further. Utilize a tripod shot with clear foreground and background elements.
- Duplicate the clip by option-dragging, ensuring no time shift.
- Hide the original background clip with V.
- Apply Auto Mask to the top clip, choosing options like Foreground to maintain subjects. Inverted Sky works for adding text over skies in drone shots. Add additional masks if necessary.
- Insert a title between clips and position as desired.
- Reveal the original background clip with V.
This technique is illustrated in Brad West’s and Dylan Bates’s videos above.
Adjusting Light in Foreground or Background
Subtle lighting adjustments are achievable with Auto Mask. While traditional shape masks are ideal for tracking light, Auto Mask is excellent for darkening backgrounds or brightening foregrounds. Apply Color Boards, Wheels, or Adjustments, masking to Foreground or Background. Selective exposure adjustments are also possible.
Creative Visual Effects
Auto Mask allows creative freedom with a lo-fi aesthetic, transforming a subject or their surroundings. Explore:
- Stylize > Halftone on Person to create a newsprint look

- Comic Looks > Comic Ink on Hair for comic book-style

- Tiling> Visual Echo on Person, inverted, to overlay original subject atop clones

- Tiling > Kaleidoscope or similar to create silhouettes

- Utilize third-party effects like FxFactory Pro’s God Rays on backgrounds for dramatic effects.

Be mindful that effects shifting the image will stay linked to the original mask position. Experiment with Handheld effects on people, offsetting shots within original outlines.
Challenges and Limitations
While altering skin color is straightforward, smoothing out wrinkles is challenging. Gaussian Blur is unsuitable, often resulting in an unnatural look. Currently, FCP lacks a blur that handles this effectively. I’m developing a skin-smoothing plug-in — reach out if interested in testing it. For now, Pixelmator Pro’s Selective Clarity, with midtones lowered, offers the best alternative. However, it requires exporting and re-importing footage, with an Auto Mask set to Skin.
Similarly, blurring backgrounds can appear artificial. Properly executing this requires a depth mask for selective blur application, which hasn’t been perfected yet. Using wide apertures on large sensors remains necessary.

Auto Mask can substitute for a green screen, but flickering may occur with smaller masks or along larger edges. Improved control over temporal stability would enhance challenging mask applications.
Finally, while Auto Mask playback is generally smooth (though not perfect), it can significantly increase render times. Use ⌃R to render specific clips when full-speed playback is needed.
Conclusion
In essence, Auto Mask significantly simplifies isolating elements in a shot without prior tracking. It facilitates experimentation with new shot types and eases changes that were previously too labor-intensive. Although not a catch-all solution, its utility suggests it may soon be featured in Resolve and Premiere. Update to FCP 12.3 to explore Auto Mask’s capabilities.